 I’ve written on this blog, quite a lot actually, about my love affair with dried beans. I’ve always loved them. Ever since I was a kid eating Navy Bean Soup. Sometimes when I eat at a Mexican restaurant, I’m really just there for the refried beans. And if the beans at a Mexican place AREN’T good? Well, then I tend to steer clear of the place from then on, regardless of how good the rest of the food is. Because if you can’t do justice to this humble staple, how much do you really care about the rest of your offerings?
I’ve also fallen in love with growing dried beans. They are easy to grow, and because I can just pull the whole plant and throw it in my greenhouse in the fall, I don’t have to get around to harvesting the beans right away. Shelling beans while sitting on the couch has become a winter ritual for us.
I tend to store my dried beans in 1/2 gallon glass containers with the year they were harvested on the lid. Once the beans are older than a year, and the new crop is coming in, I need to make room. So I pressure can anything that is over a year old.
It took me years to get around to buying a pressure canner. I don’t tend to eat a lot of things out of jars other than tomato products and fruits, and those can both be safely canned with a boiling water canner. I tend to prefer my preserved vegetables frozen. But wanting to can dried beans finally got me to take the plunge a few years ago. You just can’t beat the convenience of canned beans for getting dinner on the table fast. So why not have that convenience in a home grown product? Plus, if you’ve ever had old dried beans that just REFUSED to get soft no matter how long you simmerd them, this eliminates that problem – cause ain’t nothing staying undercooked in a pressure canner. (Which makes me wonder just how old ARE those store bought beans, because even my year old beans seem to soften up rather quickly).
 I have a Presto 1755 16-Quart Aluminum Pressure Canner (currently about $70 on Amazon). Were I to buy it again, I’d buy the 23 quart one instead. With pressure canning, you don’t cover the jars completely with water. It’s the steam that provides the pressure, so you need to leave some room for the steam to build up. With boiling water canning you do completely cover the jars. If you buy the 23 quart pressure canner, you can ALSO use it as a boiling water canner when canning quart jars. The 16 quart model is an inch too short to boiling water can in quart jars. With the 23 quart model, you can also double stack your pint jars when pressure canning, which can be a real time saver. Price of the 23 quart is currently similar on Amazon, which was not the case when I bought mine a few years ago.
The very best option is the All American pressure canner. They are a LOT more expensive, but if you expect to be canning most of that deer you hunted this year, or are looking to live off grid without, ahem, my ridiculous number of freezers, this would be worth the investment. I drag my pressure canner out a few times a year, so the lower cost option with not quite as good reviews was a worthy trade-off.
When do you need a pressure canner? Food that is naturally acidic (in this case, 4.6 or below is the safe cut off) can be boiling water canned. With boiling water canners, the temperature of the contents never gets above the boiling point of water (212 degrees F at sea level). This temperature, for a given amount of time, plus the natural acidity of the food, prevents the food from spoiling and makes it shelf stable.
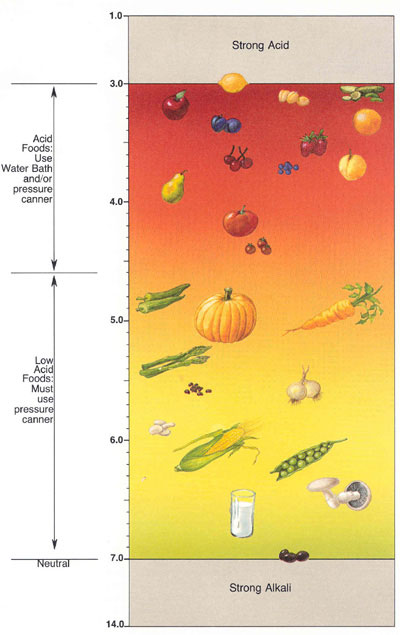 For foods that have a pH higher than 4.6, you CAN NOT safely boiling water can them. So no corn. No green beans. No dry beans. No mixed vegetable soups. And certainly no meat!
To safely preserve these foods for room temperature storage, you need the contents to reach a higher temperature in order to make them safe. To do this, you put them in a sealed container, and heat them under pressure. Because the pressure canner is sealed, the contents heat to over 212 degrees. Different low acid foods require different pressures and times, based on how the official lab tested the recipe. Sometimes you have a choice of a lower pressure for a longer time or a higher pressure for a shorter time.

Eleven pounds of pressure is standard for most recipes
The standard default for most pressure canning recipes is 11 pounds of pressure. This means the contents reach 240 degrees F (technically, 240 is reached at 10.5 pounds, but they round-up to make the gauge easier to read). Commercial canneries use 15 pounds of pressure to decrease cooking times. Fifteen pounds = 250 degrees. In order to determine safe cooking times, every recipe would need to be tested at every standard pressure, which is expensive and time consuming. So the default for home tested recipes was standardized to eleven pounds, even though other time/pressure combinations would also work if someone had done the testing. Depending on the recipe and source, you can sometimes find multiple time/pressure options.
Just like with boiling water canning, ONLY use recipes from trusted sources such as the National Center for Home Food Preservation, the more recent Ball Canning books or extension offices. Don’t use your regular pressure cooker. Only use a pressure canner. And don’t be tempted to use your Instant Pot. It’s not designed for canning (though having an electric canner that would regulate the pressure for me would be FABULOUS, so I do get the appeal).
You can also pressure can foods that you would normally boiling water can, shaving off some processing time. Tomatoes hot packed in juice go from 90 minutes in a boiling water canner to 25 minutes in a pressure canner at 11 pounds. Keep in mind though that there are additional steps to pressure canning (see below) that add to your total time, so the time savings isn’t as substantial as one would like.
 I have a dial gauge pressure canner. This means I can read the pressure on the dial, and adjust my heat accordingly. If you have a dial canner, you should have the pressure gauge tested by your local extension office once a year, just to make sure its accurate. They do this for free!
This section updated January 7, 2019 as I received further clarification on weighted regulator canners. The other option is to use a weighted regulator canner. With this canner, you put a weighted regulator over the vent pipe, and when its jiggling, you know it’s at that pressure. Any pressure above what its weighted for is released as it jiggles, keeping your pressure constant. No need to use a gauge, or if your canner has a gauge and you use the weighted regulator instead, you can ignore what the gauge says and not worry about having it tested every year! You can use different weights for the same canner. One for 15 pounds, one for 11. Turns out I’ve learned that Presto sells a multi-weight regulator with rings. No rings = 5 lbs. One ring added = 10 lbs. Both rings added = 15 lbs. Turns out the 10 lb weight, by the time its releasing overpressure, puts you right in the sweet spot of 10.5 to 11 lbs for use in most recipes. I’ve now purchased this multi-weight regulator for my canner, and will be using it from now on.
Before pressure canning my beans, I had to get clear on exactly how MY pressure canner worked. Because the instructions were all in the book it came with, but not super easy to follow, and kind of spread out in the narrative, I finally made my own cheat sheet for my canner (your canner may vary – be sure to read your own instructions).

Venting your canner before you start adding pressure is an important step.
General Pressure Canner Steps for the Presto 1755 16-Quart Aluminum Pressure Canner
- Place 3 quarts of hot water in canner + 2 tbsp white vinegar.
- Fill and seal jars.
- Place jars in canner and close lid. Leave weighted gauge off of the vent pipe.
- Heat on high until a steady flow of steam is coming out of the vent pipe. Vent for 10 minutes.
- Place pressure regulator on vent. Cover lock will lift and lock. Continue heating until the pressure gauge registers the correct pressure. Adjust heat accordingly to maintain pressure. Regulator will only begin to rock at 15 lbs.
- When pressure you want is reached, begin timing.
- When finished, turn off heat and let cool on its own. When lock releases, remove regulator and let cool another 10 minutes. Remove cover and remove jars.
The vinegar, by the way, is to keep minerals in the water from coating your jars. Works for boiling water canning too.
OK, so what about beans? How does that work?
Well, it’s a time consuming process. Well worth it when you have the time, for all the time you’ll save later. But it helps to have a day set aside for this task.


Pressure Canned Dry Beans
Ingredients
Estimate 5 lbs of dry beans = 7 quarts of canned beans. And 3 1/4 lbs of dry beans = 9 pints of canned beans. So just under 3/4 lb of dry beans per quart.”Directions
- Pick through dried beans/peas and remove any stones/dirt. Rinse to clean off any dust. My home grown beans also tend to have a few plant parts in there. These tend to float and are easily poured off when the beans are covered in water.
- Place dried beans/peas in a large bowl and cover with a few inches of water. According to Cooks Illustrated, adding 3 tablespoons of salt per gallon of soaking water allows the beans to soften but keep skins intact (assuming you want your beans to look intact and pretty in the end. I’m not particularly heart broken if my beans aren’t 100% intact at the end of cooking).
- Soak beans for 12 to 18 hours at room temperature. Alternatively, to quickly hydrate beans, cover sorted and washed beans with boiling water in a large saucepan. Boil 2 minutes, remove from heat, let stand 1 hour and drain. This will give you more blown out skins, but also removes a lot of the gas producing oligosaccharides that can cause digestive issues.
- Drain water and give your beans one more quick rinse. Cover beans with fresh water, 1/8 tsp baking soda per pound of beans if desired (Cooks says this helps with more even cooking, but don’t use too much or you will taste it) and boil 30 minutes. I use filtered water here, as our well water is very hard and full of minerals, which can slow down bean softening time.
 Fill pint and quart jars with your par-cooked beans and cooking liquid. Make sure your beans are completely submerged, (top off with additional fresh water as necessary) and leave 1 inch headspace. Note: your jars should be clean, but do NOT need to be boiled or preheated before filling. Trust me, anything that’s landed on them is going to meet its death soon enough once you start pressurizing the pot. If you are like me and have a lot of jars picked up at garage and estate sales, examine closely for cracks. Compromised jars will not withstand the additional temperatures and pressures of the pressure canner and you’ll have a blow out.
 - Add 1/2 tsp salt per pint or 1 tsp per quart of beans if desired (I do I do I do desire – unsalted beans are yucky). You can also add dried spices and herbs if you like, but NOT fresh garlic. Evidently there’s something about the density of fresh garlic that makes it impossible to adequately home can, even when pressure canning. Powdered garlic is fine.
- Wipe rims and secure lids finger tight (ie JUST enough to hold the lid in contact with the rim – the contents are going to boil in the jar, so allowing the seal to push out a bit of air is desired here – though the pressure from the outside will mostly keep that from happening).
- Process beans, using general guide for a pressure canner above, at 11 pounds of pressure; 75 minutes for pints, 90 minutes for quarts. Some loss of liquid is not unusual. As long as the jars remain sealed when cool, you’re golden.
- Once you remove your jars from the canner, you might notice that the contents continues to boil for a very long time. It’s kind of cool, and weird at the same time. Beans are dense. They hold heat well.
- Be sure to check seals after beans have cooled, and remove outside rings from jars – they are only there to hold the lids on during processing and should not be left on the jars. If a seal fails later, you want to notice it right away, which you will if the rings aren’t left on. I like to lift my jars by the lids to check the seal. You should be able to do this without the seal releasing.
Which means bean canning day is kitchen day. If you are like me and tend to be multi-tasking, this is not the day to get distracted. You really do need to pay close attention. Most importantly, you don’t want your pressure canner WAY over pressurizing and becoming a bomb in your kitchen. If you check in frequently, that won’t happen.
I tend to do all I have on hand at once, which often necessitates multiple canner loads. I also often end up with a few pint jars that are a mix of different beans.
All that soaking and par cooking? It’s important. Beans expand a LOT as they hydrate and cook. If you were to put dried beans into a sealed glass container with water, the beans would expand and break the glass. Not to mention that processing times are based on the time it takes the heat to penetrate into the center of the bean. A dry bean is going to be much harder to heat all the way through because its going to be much more dense, which will throw off your processing times completely. So no raw dried beans. And no mashed beans either (same problem, unknown heat penetration times due to change in density).
Beans I always have on hand
- Black beans – salads, salsa, soup, all things Latin. If I had to pick just one, this would probably be it. Surprisingly easy to grow.
- Pinto bean equivalent – currently growing Tiger Eye. Great for refried/mashed beans or bean dip, or huevos rancheros.
- Navy or Great Northern beans – Navy bean soup, and all things baked beans – yes THESE are the beans found in cans of baked beans. Once you have some canned, its easy to make a quick baked bean side with the addition of some some combination of bacon, BBQ sauce, ketchup, mustard, brown sugar, molasses, maple syrup, onions, garlic, vinegar….you know the drill. Mix, toss in the oven and bake at 350 for an hour or so, and you’ve got a great side that didn’t take all damn day to make. Tried to grow them this year without much success. Am looking for heirloom options.
- Red beans – Red beans and rice (a yearly staple in our house), and of course, quick homemade chili. Easy to grow.
- Garbonzo/chick peas – technically not a “bean” but the canning process is the same. Homemade humus (SO easy) and tossed into everything from vegetarian curries to salads. And falafel of course. Plentiful locally grown varieties, so I don’t bother doing these myself. But if you do, treat them like a pea, not a bean (ie plant EARLY – they can take a frost) and then don’t water them hardly at all. They are generally dry land adapted.
- Cannellini – a white kidney bean that is found in Italian cooking. We like them in a “ratatouille soup” and a white bean kale soup, to name a few. Also good tossed with some olive oil, garlic and fresh herbs as a classic white bean salad. Weirdly, undercooked kidney beans are very high in phytohaemagglutnin, which is actually toxic. People can get very sick from eating undercooked kidney beans, though boiling for 30 minutes renders the toxin inert. Yet another reason why canned is better in this instance.
Looking for bean recipe ideas. Start here. A visit to Rancho Gordo is on my bucket list for next September, when I plan to make a visit to my old stomping grounds to attend the National Heirloom Expo. (I spent my high school years in the Napa Valley).
Freaked out because you’ve heard that beans contain lectins, found in animal studies to impair growth, damage the lining of the small intestine, destroy skeletal muscle, and interfere with the function of the pancreas? Turns out that cooking legumes for as little as 15 minutes or pressure-cooking them for 7.5 minutes almost completely inactivates the lectins they contain, leaving no residual lectin activity in properly cooked legumes.
It also turns out that lectins are present in at least 53 fruits, vegetables, spices and other commonly eaten plants, including carrots, zucchini, melon, grapes, cherries, raspberries, blackberries, garlic and mushrooms—to name a few. So I think the fear is way overblown. We and our gut microbiome have evolved with this substance for a very very long time.
There is also evidence that our ancestors did indeed eat peas and beans. As someone who mostly eats paleo, we make an exception for beans. More on that debate, and why you should make your own choice, here.
© 2018 Miles Away Farm, where we’re miles away from exploring all beans have to offer, and are looking forward to growing and eating new varieties in 2019.

1 comment
Comments feed for this article
December 13, 2021 at 9:59 am
Garden Plant Families – Fabaceae (legumes) | Miles Away Farm Blog
[…] also been known to shell beans on long road trips). Once the next year’s crop is in, I pressure can whatever I have left of the older beans for quick meals. I don’t always finish eating all the […]